Pages

Saturday, April 28, 2012

Butterfly CAS

Hi there it's me again here to share a Eureka Stamps card with you. For this card I used a background stamp 
 58501 Butterfly Background but only colored one butterfly to give it a more CAS look. Eureka had awesome wonderful stamps you could use to achieve this look.


Friday, April 27, 2012

Ducky Spring


I sure like these little ducks, they come as single red rubber stamps from Eureka Stamps and using a stamp positioner made it easy to line them up across the card. The ducks and sentiment are also available as a digital image.

Copic markers were used to color the ducks and grass.

The clouds were created with a sponge and my hand cut template. 

The tiny flower edged ribbon was attached to the back of the card with single sided tape. 

I used the Perfect Layers tools from Perfect Paper Crafting to cut the even borders.  An EK Success corner rounder punch was used to cut the bottom corners.


Paper: unknown textured white, Beckett Expressions for image, The Paper Company – yellow, Memories Complete – designer paper


Ink: Memento – Tuxedo Black, Stampin Up – Bashful Blue

Thursday, April 26, 2012

The Purrr-fect Cat Stamps

Happy Thursday!

It's the last Thursday in April!  Wow this year is flying by!  Must have all ready been a lot of birthday's in my world because my stash of birthday cards is thinning out!

I made this card to throw in my stash.  This image, Large Cat Present, is perfect for birthday, Christmas, or any other gift giving occasion!  I used it on a birthday card here.


The sentiment can be found HERE.

Eureka Stamps has a bunch of cute cat images for you cat lovers out there! 

Here's a look at this same image used on a Christmas card.
For this one I used Meowy Christmas!
I colored both images with Copic Markers

Thanks for stopping by today!

Kristine

Country Brunch Invitation? Possibly.

When I started this card, I had no idea where I was going with it.
I stamped the "Large Jar and Apples" (#23105) from QKR Stampede onto water color paper and colored with water color crayons. I loved the image and how it turned out, but couldn't decide what kind of card to make with it.
One of my friends, Cheryl, suggested that it would make a cute invitation to a country brunch. I liked that direction, so it's the direction I took.
I had bought the checked paper specifically to use on some cards and it seemed to go well with the country idea and the image.
When my son, one of my trusted critics, saw it, he thought it looked like a "Grandma card"
Either way, country or Grandma, I love how it turned out.
What do you think? Leave a comment and let me know.

QKR Stampede has many images that would work great for invitations or for a "Grandma card" available in unmounted red rubber or digital.
Thanks for stopping by today. I hope you'll come again soon.

Wednesday, April 25, 2012

Baby Love...

Happy Hump day to you! This is Jessica B. today with a card for Biblical Impressions. First let me say this whole card was WAY out of my comfort zone!!....I will give ya a look and then explain.

.


See..isn't this VERY different for me? LOL

I did enjoy the whole designing process of it though. I don't normally use patterned paper..because quite frankly it intimidates me! HA! However for this card I knew that to utilize the stamps the way I wanted..I was going to have to go out of MY box.

I started by stamping this sweet baby block stamp onto light grey card stock. Then I used a few various colored pencils to add a little life to them. I was going for a vintage look and also wasn't some dimension because this stamp really lends itself to that. I cut the "blocks" out and use the larger end of a stylus and embossed the letters and a few other places for dimension ( I used my mouse pad as a cushion for the embossing), and then sanded them with a thick black nail file to distress them)  Then I stamped the cute little stuffed animals on some scrap white card stock, colored with colored pencils , distressed with the file, then used some white Flower Soft to add some "fluffiness" to them.

Next I picked out some patterned paper that i felt resembled vintage wall paper..I LOVE this paper..it has been hoarded in my stash for ever.so it was time to cut it. Next I used some cream colored ribbon and cream colored  card stock for the bottom portion of the "wall"( I adhered the ribbon  underneath the cream paper).I also wanted to make a self-like scene ( there I go making "scene" again HAHA!)..so I found some brownish wood looking paper, cut a strip, then layered a piece of pink patterned paper that I cut the swirly boarder to follow the pattern in the paper. THEN, I used a punch to make that little doily looking strip that I cut out of vellum because I wanted it on the "shelf"

Now, after all of that :), I popped the blocks up on dimensionals, and added the stuffed animals with two dimensionals ( on top of each other).
Next I tied the bow and took the picture.

here is a close-up side-view of the "bocks "

Whew...it sounds like a lot and it really may be the way I explained all of it LOL ! I am not used to that many steps in a card..ya know, I usually just color!

Ok, that is it for me today!! I hope you are having a fantastic day today..and a wonderful rest of your week! Thanks for stopping by!

Tuesday, April 24, 2012

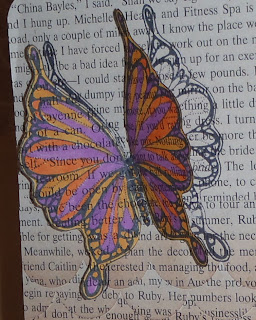
Small Lacy Butterfly

Hello stamping and crafty friends!
Kristie here today and
 I'm showing you a card that I made using
"Small Lacy Butterfly" (#58902)
I stamped the image onto a page of an old book and colored it with FlexMarkers (alcohol ink markers)
I punched several strips with a EK Success border punch
and inked them with brown ink.
I layered the scalloped strips onto a white card base for about 1/2 of the card, then covered the rest with another piece of a page.
I stamped the "Small Lacy Butterfly" onto the card.


After I fussy cut the colored image, I adhered it onto the card right over the stamped image on the card.
I lifted the wings up a bit to give it the look of flying off the card.
Eureka! Stamps has many wonderful butterfly images to choose from in red rubber and digital, so there is something for everyone.

Thanks for stopping by today,
leave a comment if you will and come back soon.

Monday, April 23, 2012

Recycling!

My seven year old niece, Kristen, has begun writing to me, and the first time I was able to find a card appropriate for a little one.  But the few kid/cute cards I have are primarily for birthday occasions; it's not my favorite kind of card to make.  I have been swamped, especially with my final papers/exams for college before my one week break (in just a few days, hurrah!), but I've put off responding for too long.  Today I had a short free spot of time, so I whipped through my stashes of card "parts" and came up with these. The card was clearly from my earliest days of cardmaking; I always back paper panels with another cardstock panel before attaching now. Additionally, I always, at least until I stopped making cards to sell, hid the prongs of my brads behind the panel, and the brads on this card were straight through it.  The God Keeps His Promises image had an ink smudge on it, so I had never used it, but didn't want to pitch it.  Perfect for a child!

So, I just switched brads, and made a quick panel to go behind the ark. Card in just a minute or two ... if only it could always be so quick!

I decided to post a card I made with the Spanish version of this image.  Did you know that Biblical Impressions carries Christian Spanish stamps? In fact, it was in searching for Christian Spanish stamps eight or ten years ago that I discovered Biblical Impressions!

Flying high in the sky...

Good morning! Jessica B. here with a cute card to share with you for Eureka Stamps today..If you haven't checked them out in a while you should. The store is full of fun images to color!
 For my card I chose this cute little swingin girl.


how cute is she??
This little girly reminds me of my 7year old daughter. She loves to swing and has a head full of curls..

This was pretty simple, stamped , colored with Prismacolor pencils and OMS, then I added some Flower Soft to the swing "ropes". Fun! Then adhered all that to a pretty piece of floral dp from my stash. I have had that paper for a really long time, and always loved but never found anything to use it with..it seemed to work here!

Ok , that is it for me today. It is actually Sunday afternoon as I type this and I have a roast to get in the oven and a chair and movie with the family calling my name!
Have a great day!!

Saturday, April 21, 2012

Painting Lady bug

Hi there It's Ceal here and it's my day to share a Biblical Impressions project with you . 
For my cad I used  82508 - Painting Lady Bug, this is such a cute stamp and can be used for a spring or fall card 

I have been enjoying all the butterfly stamps that Eureka and Biblical Impressions have.  This butterfly comes as a three part pattern, two pairs of wings and the body.  The birthday text can be found here.

I love using vellum for butterflies because it echoes the substance of their delicate wings.  This purple vellum has subtle swirls in it that adds a sublte depth to the wings.   Vellum is a little more challenging to make the curled up look for the wings than paper.  After assembling the butterfly, I weighted it down for a couple of hours to allow the glue (diamond glaze) to dry.  Then I took a long, heavy, narrow tool, and laid it across the body.  Then I took two easy mount stamps that happened to be lying near by, and pushed them under the wings.  I left it for a couple of hours, then attached it to the card.  I then lay the tool across the body again to make sure the glue adhered.

I put two pictures of the card because one better demontrates the actual purple color (it really has a rich, lovely color, not the greyish look you see in both), but the other is a much better (other than the color) representation of the card.


Thursday, April 19, 2012

QKR Stampede April "Bunny Hop"

Hello and welcome to the April "Bunny Hop" for QKR Stampede!
Today some of our design team ladies and a few guests have some wonderful inspiration to show you on our
"Bunny Hop"
Yes, you guessed it! 
Our theme is bunnies this month and even though Easter has passed, we decided that there are such adorable bunnies in the
that we wanted to feature them.
So sit right back and hop along and see what wonderful inspiration you will see on the Hop!
If you get lost along the way or one of the links isn't working, hop back here, all the participants are listed below and you can pick up where you left off.
Right now you want to hop over and see what
Ceal
has to show you and from there it will be on to
Jessica
QKR Blog (that's here)

When your done be sure to hop back here and leave us a comment letting us know what you thought of the Bunny Hop.
Also stop in to the QKR Stampede online shop and see all the wonderful stamps offered there in red rubber and digital.
Thanks for hopping with us today!
 

Smiling Bear

Happy Thursday!

I have shared this image before but he's so darn cute that I think he's worth sharing again!

This is Sunny Day Bear from QKR Stampede.


The paper is DCWV  The Natural matstack and has a cool shimmer to it!
I colored the bear with Copic Markers.

I decorated the inside with Your Smile.

I hope your enjoyed today's card and as the weekend approaches I hope you get some time to stamp!

Kristine


Tuesday, April 17, 2012

What ARE you doing???

Hello! This is Jessica B. today for QKR Stampede. I hope you are having a great start to your week. Sorry for the late post but blogger hasn't been cooperative with me for a couple of days now..but hopefully this post will go live and not out into the great blog post graveyard :)

I first have to say that I love the stamps I used here. Love love love them. I feel in love with the mice when I saw them..and my little mind  went wild with the "scenes" I could create..you know how I love a good scene right ?? LOL

 
Pretty darn cute huh?

  Doesn't that mama mouse look like she is saying "What ARE you doing"??? HA! LOVE it. ( OK..confession time..I love mice. I am probably one of the few women on the planet that don't freak out at them.( I grew up in the country btw) and I always wanted my own..you know Cinderella had them and she was the lucky right?? So when I saw these mice..I knew I wanted to make a little kitchen type wall hanging out of it..child hood memories I suppose.


Ok first up , I used this little mousy ( I call her the "mama mouse :), then I used this sassy little thing here, then I used  this fantastic jar and this bunch of  dried branches, that I turned into either flowers or a bunch of herbs..


Ok first up..I stamped everything on water color paper using a mixture of inks. For the jar I used SU! Certain Celery and Marina mist( tapped one then the other to blend them), for the mice I used Versafine sepia ink ( I wanted them kinda soft..and black doesn't usually translate to soft), for the flowers/herbs I used SU Old Olive and Certain Celery..and Real red for the flowers/berries. 

I laid in a base color with Derwent Graphtint Pencils, then went back in with Derwent water color pencils.. I thought about making this kinda bright..but in true fairytale style..I left it kinda muted and soft..the way mice in dresses are supposed to be ;)

here is a close up for ya...

That is it for me today ! Please check out QKR Stampede for some wonderful scene building stamps like these..you can bet I will be using a lot of what they have to offer!

Oh..one more thing..check back with us on Friday as will be having our monthly blog hop..this time we are 'bunny" hopping!!


Have a good one!

Quilt card


Somehow, a packet of fabric squares from my Grandmother ended up with me, which is rather ironic as I do not sew. Evidently, her parents had a factory that made fabrics, and these were some left over samples. I have a daughter who has done some basic quilting, so eventually I'll pass them on to her. However, it occured to me that I could make some fun background papers with the samples. I have a really shaky hand, so I didn't want to try laying them on the floor to photograph, so I chose several to overlap each other, and scanned them! The first time, I printed it out on an 8.5 x 11 sheet of cardstock, but then realized I'd get only two or three patterns that way, and little detail. So, I reduced the scan to a card sized panel. Then, using a stylus, I followed the scalloped edges of the swatches to add depth. I chose pale yellow and a rose pink to add to the antique look of the card. Happily, I had scalloped-edged scissors, and used them to trim the make quilts text.

Monday, April 16, 2012

Little Bees

Ok...so how many of us own stamps of bugs...and love them...however if we see the real thing we completely freak out? Yeah you know it is true...lol. I know I am terrified of real bugs, but I love the stamps. Which is one of the reasons I picked these cute little bees from Biblical Impressions. See...cute...but the real thing would make me freak. These are actually 2 different stamps. The Honeybee comes in 2 stamps so you can get him facing either direction. I stamped them off on cream CS, and fussy cut them out. Next I layered them onto some floral PP from my stash. For this one, I used some cream ribbon scraps and added a knot. Then layered the bees on using pop-dots. For this one, I used a sticker for a sentiment, and then pop-dots to put the bees on.


Both very simple, but they are actually gift enclosure size (3x3). Perfect for a summer gift!

Baby Animals

Hi there. Today I wanted to CAS card I made using the adorable Baby Animals stamp from Eureka Stamps. This is such a cute image for a baby card. Sorry the color is a little off. I took the photo outside, and it was starting to rain, so I had to make it "snappy"...lol. Anyway...I stamped the image and colored with watercolor crayons. Then I fussy cut it out and glued onto a piece of solid peach PP. For the base, I used the other side of the peach PP and layered onto a white CS base. I added some ribbon and some homemade crocheted flowers.


That is all for now! Have a great Monday!

Saturday, April 14, 2012

I will follow you...

Hello! Happy weekend. I sure hope it is a pretty one where you are!

This is Jessica B. here today for Biblical Impressions, and I have what is to date one my most favorite projects. You all know how I like to make "scenes" right?? Well here is one that I LOVE!

Isn't that pretty?? Here is a close-up..

I live on the coast and adore aquatic scenes ans stamps..with turtles being one of my most favorite..


Ok..here is the scoop..This may sound complicated..but it really wasn't. It was a bit time consuming in that it took a while to plan out and execute ! First I used three different stamps ...I used this fab Sea Turtle, then I used the Sea Weed, and finally I used these rocks. ( now you may notice that I "lost" some of the rock forms..but that is ok)

First up, I stamped the turtle on scrap paper and cut it out for a mask.Then I stamped them in SU! Old Olive on water color paper. Next I masked one turtle and stamped the sea weed, then stamped the rocks...to "ground" the images. I also only inked up one rock to make the rock on the right of the scene.

The rest is pretty self explanatory...I started painting. I used a mixture of Inktense and water color pencils. I did go back in with Prismacolor pencils and OMS to get some of the darker values..and to create the water and shadows...

Next, I just cut and matted it..I will be framing this for my bathroom as the greens are perfect for it.

Well that is it for me today..thanks for looking and I  hope you are having a great weekend!

Friday, April 13, 2012

Biblical Impressions Monthly Hop ~ Wing It


Hi there and welcome to the Biblical Impressions Monthly Blog Hop. This month our theme is Wing It! So that means anything with wings is a GO. There are some snippets above of the wings used in this blog hop. Here is the line up,
Thanks for stopping by and enjoy the Hop!

Thursday, April 12, 2012

Angel Thanks

Today I have a quick card that I made with Large Angel Heart from Eureka Stamps.

Maribeth, the owner of Eureka needed some samples of Angel cards for her sample boards so I whipped this one up for her.  I love this image because it is so versatile.  Perfect for birthday, sympathy, thank you, and lots more!


This card was quick and easy to make.  The paper is one sheet that just looks like different textures and layers.  I sewed it on to the card base just to make it more interesting.  I colored the Angel with Copic Markers.  The sentiment is Thank You from Eureka Stamps.

I don't know who makes the green trim that I adhered to the top of the card.  I just had that scrap left in my stash and it matched the paper so perfectly that I decided to stick it on.

Thanks for stopping by!
Kristine

Easter Treats

On Saturday evening I decided that I needed to make little treats for those having Easter dinner at our home.
I don't know why I do that, wait until the last minute like that, but I do it often. When I say I decided Saturday evening, I mean pretty late.
I started making these at about 11:30.
I'm a night owl anyway, so it was okay and I was happy with how they turned out.
If I had more time, I probably would have done a bit more with them, but none the less, I thought they turned our cute.
I used 2 stamps from QKR Stampede,
Daydreaming Bunny (#15209) and Some Bunny (#10603)
I stamped "Daydreaming Bunny" onto white card stock and colored them with my new set of Letraset FlexMarkers which are alcohol ink markers.
I just got recently won this set of 90 markers and was so excited to try them out.


I had so much fun coloring them in all different colors.
Of course there aren't really pink or blue bunnies, but I wanted to try out as many colors as I could of my new markers.
And boy did I love playing with them!
I can tell already that I'm going to be using them a lot.
On the back of each bag topper I stamped the "Some Bunny" sentiment.
Then stapled them to the little bags full of Easter goodies.
The treat bags were placed on each plate at the dinner table.
Everyone seemed to like their little treats and I had a lot of fun making them.
Thanks for stopping by today! Leave a comment if you like and come again soon. In the mean time why not stop in to the QKR Stampede online store and see all the wonderful images they have to offer in unmounted red rubber and digital alike.
Until next time, Happy Crafting!

Wednesday, April 11, 2012

Eureka Dog in box


Greetings! 
Today I am featuring a 
Eureka stamp called 
#25805(263)


Image stamped onto watercolor paper 
and colored with Tombow markers
 with a blender pen.

I just love his silly face!
Thanks for stopping today!
See you soon!
Barb

Tuesday, April 10, 2012

Up, Up and Away

Hello and Welcome!
Today I'm showing you a fun card I made with stamps from
I used 4 different stamps from the Balloons/Holders category.
I stamped "Flying Girl Holder" (#21701) onto water color paper and colored her with water color crayons.
I stamped "Oval Balloon" (#5201) and "Heart Balloon (#5204) onto a variety of scraps.
I fussy cut all the pieces.
The background and hills were pieced onto a white card stock base.
I then added all the cut pieces and stamped the
"Up, Up and Away!" (#11802) sentiment onto the card.
I loved the card, just needed to add the strings to the balloon.
Well, let me tell you, card making is not an exact science and at times we just need to go with the flow and remember what I always say
"There are no mistakes, just chances to be more creative."
Well, this was one of those times!
I didn't think about the 'hills' being cut out of vellum when I stamped the sentiment.
VersaFine Ink does not dry on vellum, so when I went to tie the strings onto the balloons the black ink smeared all over the card.
Luckily most of it cleaned off with a baby wipe.
I stamped the sentiment onto white card stock, fussy cut it and
adhered it to the card.
Honestly, I like it better before, but as they say, it is what it is.
I still like the card, just not as much as I did before my chance to be more creative.

Why not stop into the Eureka! Stamps site and check out all the adorable balloons and holders that are offered.  There are a lot to choose from, I'm sure you'll find some that you will just love.
Thanks for stopping by today.
Leave a comment if you wish and come back soon.

Sunday, April 8, 2012

Eureka Stamps Butterfly Blog Hop

Welcome to this months Eureka Stamps Blog Hop!

This month we are sharing some of the beautiful Butterfly images that are available from 
Eureka Stamps.

Eureka Stamps has a ton of awesome  Butterfly images  available in unmounted red rubber and in digital and you are sure to be inspired to create something special for your loved ones after this hop!


To start the hop off I thought I'd share a couple of cards that have been posted on this blog before because they are worth seeing again!


This first card is a lovely card by Design Team member, Jessica Beare, that uses
Butterfly Background.


The second card by Ceal, uses one of my favorite Eureka images, Butterfly and Sunflower.


If you are looking for more Butterfly inspiration you'll want to check out this months Blog Hop!

Next stop on the hop is Barb Best .


If you get lost on the hop or one of the links is bad come on back here to see the order:


Barb
Ceal
Jessica B 
Jessica S 
Kristie
Kristine
Roxie

Thanks for hopping with us!

Saturday, April 7, 2012

Beautiful Hybiscus


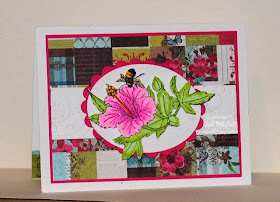
I got all busy with Easter preparation and totally forgot to post my card for Eureka Stamps. So here it is I used the stamp  21001 Hybiscus & Bee, pretty stamp huh? I colored it with my copic markers and added a little shimmer to the flower and bee's wings.

 Check back Monday because we are having our monthly hop and you don't want to miss all the inspiration

Gladiolas and Hummer from Eureka


Hi and Happy Saturday to everyone, it's Roxie here showing one of Eureka's digital images which is also available in rubber.

The image was colored with Copic markers.

The embossed layer is stripes of scrap cardstock that needed to find a purpose so I embossed each one and arranged them in a crazy quilt pattern and added a bit of Stickles to each one. Stickles was also randomly added to the image panel.

I used a heavy carpet tape layered to pop up the bordered embossed panel and also the oval panel but slightly higher.

Paper: unknown textured white, Beckett Expressions Iceberg for image

Ink: computer ink and copics

Accessories: Stickles, carpet tape

Tools: Cuttlebug and embossing folders, Nestabilities

Friday, April 6, 2012

Peeking Kitty

Hi it's Roxie here working with these happy cats to create a the perfect scene.

The kitties and large flower were colored with Copic markers: large cat – special black, Y35, YR23,31, RV00, small cat – C00,1,2,3,5,7 RV02, flower – V12,15,17, BV08, shading on leaves - G29

The sky is sponged on using my hand cut template, you can find a pattern to cut your own here (it's a link back to my personal blog).
The fence is cut with a Sizzix die which I then cut in two to stretch the width of the card. I stamped the fence with a small texture image from Biblical Impressions and rather than pull out the grey ink pad I just stamped off with the black onto scrap paper before stamping the fence. It’s attached to the card with Aleene’s tacky glue.

The grass is cut with a Martha Stewart punch then sponged with ink and attached with tacky glue.

The small flowers are a Fiskars border punch and when I want just the flower I cut a ½”strip to insert into the punch under the flower. If you need a visual see the second photo in this post. The center is cut using a Sizzix button die and glued to the flower. The stems and leaves are free hand cutting and they are also attached with tacky glue.

click to enlarge

The corner flower arrangement is two Martha Stewart punches for the greenery, those smaller flowers again and an EK Success punch for the large flower. The large flower is dry embossed using a metal ball stylus and folded paper towel for cushion.

I used the Perfect Layers tools from Perfect Paper Crafting to cut the even borders. Use any brand craft knife for cutting. A tutorial video can be found on the company site.


Paper:Neenah speckled base, The Paper Company – purple and yellow, Beckett Expressions for cats image and large flower, Stampin Up – green, yellow for small flower centers, unknown white for fence and top panel, Die Cuts with a View for large flower center

Ink:Memento – Tuxedo Black for image and also stamped off before stamping the fence, Stampin Up – greens for sponging grass