Pages

Wednesday, August 31, 2011

Tender Thoughts

I've been playing with some of the Tender Thoughts images this month and wanted to share them with you today. These are from Eureka Stamps and you can purchase the images in digital or rubber.


The image is colored with Copic markers: bee – Y15,17,19, B0000, flowers – R20,20,22,24,27,29, stamen – YG61,63,67, Y35,38, leaves - YG61,63,67

The reddish pink panel is Bazzill punched with EK Success Scallops and Dots border punch and the half pearls are attached with Aleene’s Paper Glaze.

The lace on the bottom is scrap lightweight paper punched with Martha Stewarts Doily Lace border punch and they are sculpted/beveled with a large metal ball stylus and folded paper towel for cushion and I did this just on the edge. After attaching it to the card I used a gold sticker tape to dress up the edge. Sorry I don’t know the company name for the sticker.

Image: Eureka Stamps – digi56201 Thank You (also comes in red rubber)

***
Copic colors: flowers - B000,21,97, BV0000,01, C00, G82,85,94, C00,0,01, Y15,17,19,38

Images: Eureka Stamps - 21201 Butterfly and Bluebonnet , digi402(212) Just a Note
Paper: Unknown white textured, The Paper Company – navy, Beckett Expressions – Iceberg, K&Company designer paper
Ink: Memento – Tuxedo Black
Accessories: Queen & Company – self-stick pearls, foam pop dots, copics
Tools: Stampin Up – ticket punch, Spellbinder – petite oval Nestabiliites
***

Copic colors: flower – Y21,23,35,38, E25,29, YG61,63,67, butterfly – BV02,04,08, Y15,17,19, C2, shading – C0,1,2

I stamped a second butterfly, cut out, embossed/sculpted on the back side by outlining the area on the front with a small metal ball stylus, turn it over and emboss with varies sizes of stylus according to the area size; a paper towel is used for cushion. The image is attached with Aleene’s tacky glue.

EK Success Scroll and Dots punch was used for the border.

The yellow border and punched border are strips of cardstock glued at the same level as the image panel to save on cardstock and card bulk.

Images: Eureka Stamps –  20801 Butterfly and Sunflower608 Happy Day
Paper: Bazzill textured white and lavender, Stampin Up – yellow, Beckett Expressions – Iceberg for image
Ink: Memento – Tuxedo Black, VersaMark pen
Accessories: Sticky Powder, glitter, copics, Aleene’s tacky glue

Saturday, August 27, 2011

Get Well Bear

Happy Saturday!

Today I have a fun little card for a not so fun occasion.  I needed a get well card for a friend of my hubby's  who just had surgery and came up with this little cutie.

There are so many different ones that you'll always find the perfect bear for any occasion!

Stamps:
Paper:
Patterned paper unknown
Bazzill Basics Cardstock
Neenah white cardstock
Ink:
Memento Tuxedo Black & Bahama Blue dye ink
Copic Markers
Other:
Brads

So glad you stopped by today!  Have a great weekend!

Kristine

The Beach

I used the Biblical Impressions Palm Tree image for this peaceful scene and you can find it in the Landscape section.
The scene is created by masking with torn paper and sponging on ink. I tear the water line as straight as possible; I like torn paper to create waves

After all the sponging is done I remove the oval mask and stamp on the tree. To create a mask so I can sponge on the tree trunk color I cut out the truck and discarded it and use what we would normally throw away.

Prismacolor pencils were used to add color to the leaves and coconuts and I’m thinking now…why didn’t I do that for the trunk!

Signo white gel pen was used to add the water foam.

My faux brads were cut from cardstock with the Cuttlebug Tiny Tags die, glued to the card and covered with Aleene’s Paper Glaze.

The base is stamped repeatedly with a small background image without masking.

The image panel and border are popped up with pop dots.

Images: Biblical Impressions
Paper: unknown - tan, Bazzill – light turquoise, Beckett – white
Ink: Memento – Tuxedo Black, Ranger distress inks: scattered straw, dried marigold, spiced marmalade, tea dye, frayed burlap
Accessories: Aleene’s tacky glue, Paper Glaze, Signo white gel pen, Prismacolor pencils
Tools: sponge, Nestabilities, torn paper, Cuttlebug Tiny Tags die

Friday, August 26, 2011

Send In The Clown

Have you been checking out the many balloon, and balloon holder stamps, we have been showcasing at Eureka Stamps this month?
I have one more card I would like to share- hope you like him.

I used the following stamps
This is such a simple design but I enjoyed all the pieces together. I cut circles out the front of the card and matted a larger shape around each.
I colored all the images with Copic markers, and cut out each image.
I centered each animal to pick out from the circles except, for that one stray balloon that always seems to get away!

I used string from Pizzazz Aplenty to anchor the other balloons.
So glad  I could share so many balloon holder, and balloons with you this month.

High Seas (QKR Stampede)

 I hope you have a great Friday, here's another masculine card using the Small Ship from QKR Stampede.  The rubber image comes in three sizes and you can aslo purchase it in digital form.

The ship was stamped on paper that doesn’t give a nice clear image so it would have that muted look to match the designer paper. It was roughly colored with Prismacolor pencils and blended with the Prismacolor blender pencil.

All panels except the recycled tag were ink distress with Ranger Distress Ink – Tea Dye. That tag came as you see it.

The Tim Holtz clear ruler was used as a guide for piercing the narrow panel.

The image panel is popped up on foam tape.

Images: QKR Stampede21702 SM Ship
Paper: Bazzill – turquoise, MFP – beige, Keepsake Essentials designer paper
Ink: Memento – Tuxedo Black, Ranger Distress Ink – Tea Dye

Thursday, August 25, 2011

A little Gift

Sorry this post is a little later then what I would have liked ot have it up, but we had a pretty nasty thunder storm last night, and it knocked out my Internet. I don't do well without my Internet or wifi...lol. Well, today I wanted to share a little experiment with you. I have seen these done before, but wasn't sure the measurements, so I "experimented" myself, and ended up with a cute little gift. Well, I started with one of those tall note pads you can get from the $1 section of the craft stores or Target. They have magnets on the back, so I just ripped those off. (those magnets may come in handy another time.) Then I did some measuring, and finally ended up with this...

Cute huh? I used the coffee cup/tea cup paper that I picked up at my LSS. I measured the notepad, and cut the paper accordingly. I am finding that to give exact measurements to you would be pointless, because the other pads I did this with are a different size then this one. So the best I can tell you is to measure the pad, and add a 1/4 - 1/2 inch to each side for a little boarder. The "binding" or folded edges are about 1/4 inch more then the actual thickness of the pad. Next I decorated the front. The coffee mug is actually a little magnet that came with the notepad I used. I simply ran it through my Xyron, and attached it. My favorite "embellishment" is the stamped Sentiment. That is just so funny to me...since I am such a coffee person. I don't' function without my coffee in the morning. This summer I have switched to iced coffee so I still get my coffee, but it isn't too hot to drink in the heat. Well that sentiment is a stamp from QKR Stampede. It is called Smell the Coffee, and was just perfect to go with the saying on the notepad. Check out the inside... After I finished the front, I felt the inside needed a little something more, so I added the little pocket. Again, the measurements depend on your notepad for the pocket, but I just measured it with some extra room for tabs (so fold under and add adhesive). For this one, I stuck a few little instant coffees in there. Thanks for stopping by, and have a wonderful day!

Seashells


Here a quick card using the Shell Border image from Eureka Stamps, it’s great for the guys and would work for the ladies too. 

The sand base and background layers were sponged using a sea sponge with sand colored water based ink, however there was some darker ink on the sponge from another project that I let work for me and I like the results. 

The torn papers were all scarp and this is a great way to use it up.

Copic markers were used to color the  image.

Images: Eureka Stamps - Shell Border
Paper: Remember When - Black, Bazzill - sand, and white, unknown cream, Beckett Expression - Iceberg
Ink: Memento - Tuxedo Black, Stampin Up - sand and I think Ranger distress ink - Vintage Photo

Wednesday, August 24, 2011

Fly Fishing with Biblical Impressions

Hello! 
Today's card features a cute stamp from 
Biblical Impressions called Fly Fishing. 
Couldn't resist this stamp when I saw it!
I had these cute fishing themed 
background papers from Karen Foster. 
I knew they'd be perfect for this stamp!

I watercolored the image with watercolor pencils.
Thanks for stopping today!
Come and visit again!
Barb

Rope em Cowboy

I started with 22303 Cowboy Christmas Tree from QKR Stampede to make a couple fun Christmas style cards to add to my stash.
QKR stampede has many boy images and boy type toys available- we are trying to share many ideas with you all month long.

I am showing two variations of the same image- both were colored with Copic markers. The top card I cut the image out and pop dotted to the card.
The second card I used the image matted.
All papers are from my personal stash. Twine and decorative brad from CTMH.
Isn't this a fun image to use for a Christmas card? Love that these are really non-traditional colors blended with traditional.

So hope you pop over to QKR Stampede and check out the many images- you might be surprised what you find.

Happy Day Card

Hi all, Kristie here today!

Today I'd like to share with you a "Happy Day" card.
For this card I used the "Butterfly Background" (#58501) from Eureka! Stamps
I also used part of the "Happy Birthday" set (#22803) from QKR Stampede and some of their lovely paper flowers. 
Did you know that QKR Stampede also has supplies other than stamps?
If you "Go Shopping" then click on the 'supplies' link you will see that there are links for Sticky Powder, Paper Flowers, Gold Leaf and more.

For this card, I started with plain white card stock and used Distress Ink to make a nice shade of sky blue, I layered the paper flowers and added some brads in the centers and attached them to the card with glue dots. 
I stamped the "Butterfly Background" on water color paper with VersaFine ink and colored it with watercolor crayons, fussy cut one of the butterflies and attached it with a pop dot on the body area. I 'curled' the wings out to give them a bit of a 3-D look.

I have cut apart the Happy Birthday greeting from the "Happy Birthday" set and used the pieces to stamp Happy Day onto the front of the card.

Thanks for stopping by today, I hope you will stop by Eureka! Stamps and 
QKR Stampede and check out the stamps and other supplies that they have to offer.

Until next time, Happy Crafting! 

Tuesday, August 23, 2011

Fall Leaf

Hello! I don't know about where you live, but here in Buffalo, NY I think summer has left us. Although, I will admit that I am finally able to sleep at night, and I LOVE the cool temps at night. My husband thinks I am crazy, but I love sleeping with the cool breeze coming in the window, and a blanket on...lol. I know in some parts of the USA, the kids started back and school this week. My kids don't go back until Sept. 7th, but I can feel the "fall" spirit. So today I decided to share a fall themed card with you using the Solid Oak stamp from Biblical Impressions. A very simple card for you here, but sometimes simple is good. I really wanted the focus of this card to be the leaf. So I stamped it with Versamark, and embossed with copper embossing powder. Then I fussy cut it out, and curled up the edges just slightly. When I glued the image down, I only put glue along the "veins" of the leaf, so the edges would stand up. The PPs I used are from CTMH, and the lace ribbon trim is from SU. Thanks so much for stopping by, and have a great day!

Mosaic Squash


It's Holly posting today, and I fell in love with this Mosaic Squash when I saw this in the Eureka store. There is a whole collection of mosaic images - squash, pumpkin, leaves, and sentiments. Look under the Fall section in the store and you'll see all the mosaic images on pages 2 and 3.


I used the Tissued Color technique from Technique Junkies to color in the squash, and I sponged the edges of the oval with some Antique Linen distress ink. I added some raffia, some punched leaves, and this pretty little flower on the edge of the image. That pretty little flower is from the Orange paper flowers collection in the QKR Stampede shop.

I love the fall season - cool, crisp air contrasting with the warm sun shining down on me, hay rides, trips to the pumpkin patch, and the promise of some great holidays coming up. Ahhhhhh.........


Stamps: Mosaic Squash from Eureka Stamps
Ink: Curry, Tangerine, Durango, Walnut Stain, Antique Linen
CS: Curry, Chocolate Chip, Vanilla, Indian Summer (Basic Grey)
Other: button, raffia, Frond punch (Martha Stewart), oval dies, brads, flower from QKR Stampede
TJ Technique: Tissued Color

Old Lady Snowman

In Germany we have now at last a few days of summer. The sun is kind to us and we enjoy the beautiful weather.
Nevertheless, I decided this week for a winter card because Christmas always comes so suddenly. This is the image
"Old Lady Snowman" from the Shop QKR Stampede. I like the old lady :-)


I colored the image with watercolor pencils and I wiped with terpentine.

Have a nice week

Sunday, August 21, 2011

Welcome To The Circus

 How about some fun balloon and balloon holders to share from Eureka Stamps?
I stamped (with Stazon) these images on a shrinky Dink type material from Wendy Vecchi.
I colored on the backside of the stamped image with CTMH markers.
Once the ink was dry I cut out each of the images- then I used a white wash paint to cover the back.
I used wooden skewers and hot glued the images.
The container is a decorative white band-aid box with animal paper from CTMH.
I am sharing a couple views that can be clicked on and viewed closer.
 All the images were colored with Copic markers and accented with Liquid glass.

Zebra balloon
Rhino balloon
Eureka Stamps has many Balloon images and Balloon holders available, hope you check them out.

Friday, August 19, 2011

Trains,Boats,and Cars = Boys

Well here we are again- this time we are back with a QKR Stampede Boy Theme Blog Hop. It could be Trains, boats,or cars-Just to name a few.

Do you create a lot of projects/cards for boys?
Today we are hoping to share many of the stamps available at QKR Stampede that would work for boys.

The official start time is Friday August 19th by 6:00AM- so please be patient if all the links are not working yet.

The ladies have been hard at work- we hope to give you some inspiration . Our line up is listed below- if you find yourself lost during the hop all you need to do is pop back here and check out the list.


How about a small sneak peek ?
Thanks for hopping with our QKR Stampede Design team
Now off you go to Dawn's blog- to start your hopping.

Eureka! Stamps - Hummingbird Birthday

Hello everyone,
 
Today I want to show you a image from Eureka! Stamps. This is one stamp from the Tender Thougths
I decided me for the image "Hummingbird Birthday", because I need a birthday card.
But look at some images in the stamp shop, there are a lot of stamps for the opportunity to say thank you or to ask for forgiveness or other. I am very excited about the stamps.You can buy the stamps as you want, rubber stamps or digi-stamps.

On my card is a digi-stamp. I colored the image with watercolor pencils and I wiped with terpentine.

 Have a nice weekend.


Thursday, August 18, 2011

Mama's Little Man

Hello there blog followers!

Kristie here and I'd like to share with you, a kind of silly card that I made using a couple stamps from QKR Stampede.

The image I used is "Picking" (#15714)  I stamped it onto watercolor paper and colored with watercolor crayons.
The sentiment "Mama's Little Man" is from a digi stamp
"Mama's Man" (digi15211)

Since the sentiment is a digi I could cut out parts and rearrange the words to fit the card.  The stamp actually says "From Mama's Little Man" but I rearranged it for this card. 

Did you know that most of the QKR stamps (if not all) come in rubber and digital form?  With the digi you can resize them and make them work where you need them.  I don't do a lot of digi, but it is a wonderful option to have.

When my son was a baby, I used to call him my little man.  He was a big baby at 10 lb. 3 oz. and just looked like a little man.
On Monday that little man turned 19 yrs old.
I told him this card would be perfect for him.  LOL!

Thanks for stopping by today, leave me a comment and tell me how old your kids are.

Until next time, Happy Crafting!

Wednesday, August 17, 2011

On the course with QKR Stampede


 Isn't this the cutest golfing bear ever? 
Looks like she has a great swing going!
This is a stamp from QKR Stampede. 
It's called "on the course"


I paired her with some cute
 golf themed paper I have.
Image was colored with pencils 
and blended with mineral spirits.
Thanks for stopping today!
See you next time!
Barb

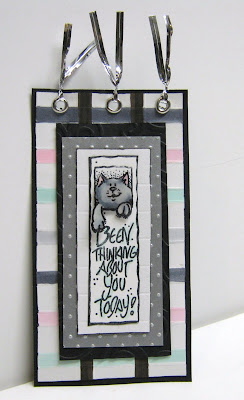
Recycled Bookmark?

This month at Biblical Impressions we are trying to share a few ideas using stamps to make bookmarks.
I have a very simple one that used scraps on my desk to make with a cute stamp.
39204 been thinking was something I chose because of that adorable cat.
Started by stamping this image twice. I used one to just color the cat, then fussy cut and add as dimension.I used a recycled product-can you guess what it is?
There are 6 layers on this simple bookmark- many were embossed to add some details.
I bet you have lots of scraps just waiting for a project- how about checking out the bookmark stamps at Biblical Impressions.
Thanks for popping in today.


Oh yea-did you guess what the recycled product was on my bookmark?
Well of course it is the silver twist ties! lol

Aaargh! Another Eureka Balloon Holder card!


Ahoy!
Today's card features stamps
 from Eureka Stamps.
The Pirate balloon holder 
with his parrot ballon.


This would make a cute
 child's birthday card, wouldn't it?!
I colored the image with colored pencils.
The background is a little bit of sparkly chalk.

Thanks for visiting today!
Until next time!
Barb

Tuesday, August 16, 2011

Cow and Cowboy


It's Holly posting today, and I've got one more Cowboy and balloon card to share with you. I have had lots of fun with this adorable Cowboy Holder from Eureka, and I've paired him up with a Cow Balloon today. Isn't that a hoot?? You've just gotta go look at all the cool balloons and holders in the Eureka store - so much fun!

I colored the images with Copic markers, and then I created a scene by cutting out some clouds and some grassy green hills. Unfortunately, we don't have green hills here anymore - just brown crunchy mounds. I can't remember the last time we had any rain here, it's been that long. We've been fortunate enough to still have some grass down in our meadow, and our parents have been moving their horses so they can graze down there. My husband has only had to mow maybe 3 or 4 times this summer, quite a change from when he usually had to mow every weekend.

I hope you're having a wonderful week! Stay cool!

Stamps: Cowboy Holder, Cow Balloon (Eureka Stamps)
Ink: Tuxedo Black Memento, Celery
CS: black, white, Celery, Bashful Blue
Other: copic markers, linen thread, sponge, glitter pen, cloud die

We Will Serve

Good Morning! This card uses Biblical Impressions 37003 - We Will Serve image.
Image is colored with markers and papers are from my scrap file.

Monday, August 15, 2011

Go Team!

Hi there. Today I wanted to share another simple card made using the Balloons and Holders stamps from Eureka Stamps. These really are so fun to use, and so much you can do with them. My fellow DT member Kristie even made a framed wall hanging with it! Well, sadly football season is upon us again...yes I said sadly...lol. Although that does mean that I get Sunday's to CRAFT!!!! Here is my football themed card.I started by stamping the Cheerleader Holder, and paper piecing her clothes. I chose blue and white, because that is my DDs' school colors. Then I used some Maya Road fibers as "string" to attach the Football Balloons. I used foam tape to make them "pop"! Then I hand wrote the "Go Team". I used a blue marker to color some of the pom pom, then I used Diamond stickles to make it shiny. A very simple card, but with these balloon and holder stamps, that is all you need! Thanks for stopping by!

Pig Mud

Here in Berlin, now the holidays are over. The most days in the holiday was rainy days. It's just not fun anymore, ever again this rain.
Today I will show you a card with a cute little pig. At least that might be in the water to feel comfortable. The stamp name is
"Pig Mud" and it is a image from the Biblical Impressions.


I colored the image with watercolor pencils and I wiped with terpentine.

Have a nice week


Saturday, August 13, 2011

Have you heard the news?

I don't actually have any big news but I just wanted to share this adorable 

He is so cute and sooo fun to color.  I was really excited when I found this paper in my stash because it works so perfectly with the pattern in his sweater!


It's hard to find images for boys and men but QKR Stampede has a fabulous selection of masculine images and adorable boys too!  Go check them out...I'm sure you'll find the perfect one for any occasion!

Stamps:
News Boy by QKR Stampede
Heard the news by QKR Stampede
Paper:
We R Memory Keepers patterned paper
Bazzill Basics cardstock
Neenah white cardstock
Ink: 
Memento Tuxedo Black dye ink
Copic Markers
Other:
Red Brads

Thanks for stopping by!  Have a great day!

Kristine

Cattails from Biblical Impressions

This is a super quick card to create and there are many occasions when we could use one of those. The sentiment could be changed to fit any occasions also.

The image was colored with Gallery watercolor pencils and a water wand/brush for blending the colors. This works well if the bristles are just barely wet so the paper won’t warp.

The embossing at the top was done with a folder from the Cuttlebug set Organic Flourish and the line embossing was done with the Scor-Pal.

The sentiment image was stamped directly on the watercolor paper but my new StazOn pad is actually a bit to full and the ink pooled so cutting and embossing a rectangle panel made a perfect save for the card.

Images: Biblical Impressions - 91207 Cattails Sketch, 36601 Thinking of you

Friday, August 12, 2011

Were Friends

Eureka Stamps has some of the cutest images available such as these Balloon and Balloon Holder images.
Now this is such a fun scene and I so enjoyed creating. 
Card stock from my stash- EK Success tree punch.
Grass made with Martha Stewart fringe scissors
mini wood fence from Christmas supplies.

All images were colored with Copic markers, fussy cut, and pop dotted at various levels.
Hope you take the time to check out all the fun Eureka Stamp images and hopefully you will find some you would like to play with.

The Big One!


Here is a fun image for the guys of any age that enjoy the sport of fishing and this little guy has caught himself a big one!  The image is from QKR Stampede.

Copic colors: fish C00,0,1, BV0000, B0000, G82,85,94, YG61, RV00, R81,83, YR12,23, bear R20, E00, 21,25,27,29,33, shirt sleeves B93,95,97,99, sign 100 on the edge, W1,3,5, C0, 1 on the nail, shading around the bear W0,1.

EK Success Bracket border punch was used to make the waved edge bordering the designer paper.  A strip of cardstock was used for the rust border and also the green border at the bottom of the designer paper.  The Cuttlebug Tiny Tags die was used to punch the faux brads; all of these are attached with Aleene’s tacky glue.

The image panel and borders are popped up with layers of thick carpet tape and the sign is attached with foam tape.

 
Images: QKR Stampede - 20406 Fishing Bear, 15002 Gone Fishin
Paper: The Paper Company – blue, green, Stampin Up – rust, Beckett Expressions Cover – Iceberg for image, unknown white for border and designer paper
Ink: Memento – Tuxedo Black

Thursday, August 11, 2011

Flowery Fun

Today I want to share a card I made using an image that i have used MANY times before, but I just love him. QKR Stampede has some great turtle stamps, and this guy is one of my favorite of the turtles. He has so many themes you could use him for. My card today is a "blank" card, so really he could be used for anything...birthday, thank you, just because... See...isn't he cute? This guy is the In Love stamp. I stamped him off, and colored with watercolor crayons. I fussy cut him out, and layered on to the blue PP. All the PPs on this card are from SU, and have been in my stash for at least 4 years...lol...I am a paper hoarder! I also pulled out my paper distressing tool I haven't used in forever too. I decided to distress all the papers for this one. Last, I added some of these Paper Flowers. If you didn't know yet, QKR Stampede also has paper flowers now! These flowers are great! You get so many in each pack, and there are so many colors to choose from. They are all made of mulberry papers, and very fun and easy to work with. They layer together so nice! I used a brad to hold mine together.


Well that is all! Thanks for stopping by and have a fabulous day!

Garden Bear


I love this bear from Eureka, he’s a great image for the gardeners in your life and I think it would work well for either gender.

I masked off the bear with straight edged sticky notes, nothing tedious and stamped on the tiny flowers to the right of the bear which is a partial image.

The out of the box feature is very easy (I use a guillotine paper cutter) by cutting to the image with on the front, marking the image on the back side while holding to a light source then use the paper cutter again to cut to that mark.  The remainder of the cutting for the watering can is done with scissors.

Paper: unknown except for the Beckett Expressions Cover – Iceberg for the image
Ink: Memento – Tuxedo Black 
Accessories: The Paper Studio – brads, Copic Markers